
Sauna Installation Guide: YardSauna Forest 3-Person Infrared Sauna
Bringing a home sauna into your life feels like a big step, but with the right guidance, the installation process can be surprisingly straightforward. The YardSauna Forest 3-Person Infrared Sauna is designed for homeowners who want a premium, low-EMF sauna experience without the complexity of a custom build. This guide walks you through every phase—from unboxing to your first session—so you can install your sauna with confidence and start enjoying its benefits sooner.
Understanding the YardSauna Forest 3-Person Infrared Sauna
Before you start moving boxes, it helps to know exactly what you are working with. The YardSauna Forest 3-Person Infrared Sauna is a pre-built, modular cabin designed for indoor use. It measures 60 inches wide, 45 inches deep, and 75 inches tall, which makes it spacious enough for three adults while still fitting comfortably in many home spaces. The cabin is constructed from 100% non-toxic Canadian Hemlock, a wood prized for its durability, light color, and resistance to warping in humid environments. The front wall features a panoramic tempered glass panel, which opens up the interior and gives the sauna a modern, airy feel.
What sets this sauna apart is its heating system. Instead of a single heater, the Forest uses a surround full-spectrum heating matrix that combines high-output quartz heaters with ultra-low EMF carbon panels. This means heat reaches you from multiple angles—front, back, and sides—for a more even and enveloping warmth. There is also a wide-format overhead red light and near-infrared (NIR) array that spans all three seating spots, plus an extended tourmaline floor heater to warm your feet and lower legs. For comfort and convenience, the sauna includes Bluetooth audio, a digital touch console, ambient LED lighting, and multi-speed ventilation.
Because the Forest is a pre-built unit, you do not need to frame walls, install insulation, or run complex ductwork. The panels use a tongue-and-groove system that locks together with minimal tools. Most two-person teams can complete assembly in 45 to 60 minutes. However, the electrical requirements are more specific: this sauna runs on 220V-240V and requires a dedicated circuit. That is not a standard 120V wall outlet, so you will likely need a licensed electrician to run the appropriate wiring. Plan for that step early in your timeline.
What is in the box?
When your YardSauna Forest arrives, you can expect several large, well-packed cartons. Inside, you will find the pre-finished wall panels, floor and ceiling sections, the bench assembly, the glass door and front wall, the heater panels, the control console, and all necessary hardware. The packaging is designed to protect the wood and glass during shipping, but you should still inspect everything for damage before you begin. Look for any cracked panels, broken glass, or missing hardware, and contact customer support immediately if you find an issue.
You will also receive an instruction manual with step-by-step diagrams. Take time to read through it fully before starting—even if you are an experienced DIYer, the manual will clarify the specific order of assembly for this model. The Forest uses a front-wall-first assembly sequence, which is different from many other sauna kits. Understanding this upfront will save you frustration later.
Tools and materials you will need
Most of the hardware is included, but you will want a few basic tools on hand. A cordless drill with a Phillips head bit, a rubber mallet for tapping panels into place, a level, and a utility knife for opening boxes are all helpful. You may also want a step stool or small ladder for the ceiling panels. For the electrical hookup, you will need a licensed electrician who can install a 220V-240V dedicated circuit and the appropriate outlet or hardwired connection, depending on your local code and the sauna's plug configuration.
Step-by-Step Installation Guide
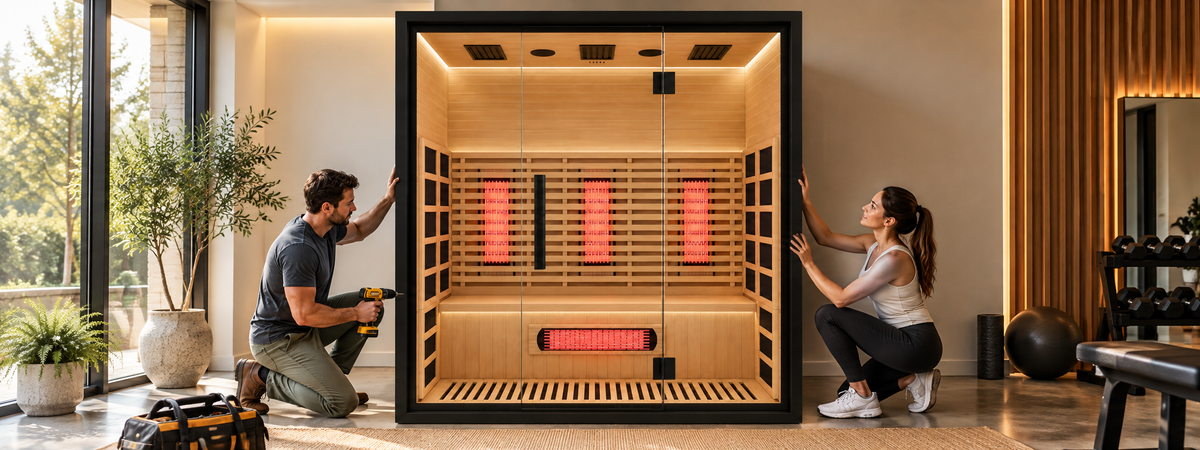
Installing the YardSauna Forest is a manageable project for two adults with basic DIY skills. The key is to follow the sequence carefully and avoid rushing. Here is a detailed walkthrough of the entire process, from unboxing to final checks.
Step 1: Choose the right location
Before you open a single box, decide where the sauna will live. The Forest is designed for indoor use, so choose a dry, well-ventilated space with a level floor. Basements, spare bedrooms, home gyms, and large bathrooms are all popular options. The sauna needs at least a few inches of clearance on all sides for ventilation and access to the rear buckles during assembly. You will also need access to the electrical panel for the dedicated circuit.
Consider the floor surface. The sauna weighs several hundred pounds when assembled, so it should sit on a solid, level surface. Hardwood, tile, concrete, or vinyl are all fine. Avoid carpet if possible, as it can trap moisture and make leveling difficult. If you must place it on carpet, use a rigid plywood base underneath to distribute the weight and provide a stable foundation.
Also think about proximity to a bathroom or changing area. You will want a place to cool down and hydrate after your session. And while the sauna itself is sealed, some moisture can escape when you open the door, so avoid placing it directly against drywall that is not moisture-resistant, or add a simple backsplash or tile behind the unit.
Step 2: Unbox and organize
Once your location is set, move the boxes into the room—or as close as possible. The panels are heavy, so having them near the final spot will save you from carrying them across the house. Open the boxes carefully and lay out all the parts. Group the wall panels, floor sections, ceiling panels, bench pieces, and hardware into separate areas. Check the parts list in the manual against what you have. If anything is missing or damaged, contact the retailer before you start assembly.
Step 3: Assemble the floor
The Forest uses a floating floor design, which means the floor panels sit directly on your subfloor and are not attached to the walls of your room. Start by laying out the floor sections in the correct orientation. The floor has a slight lip or channel around the perimeter where the wall panels will sit. Use the rubber mallet to gently seat the floor sections together, making sure they are flush and level. If your floor is not perfectly level, use shims under the low spots to prevent rocking.
Step 4: Attach the front wall and door
This is where the Forest differs from many other sauna kits. You begin with the front wall, not the back wall. The front wall includes the panoramic glass door and is the heaviest and most fragile piece. Have two people lift it into place on the floor channel, then secure it according to the manual. The front wall must be plumb and square before you proceed, so use a level on both the vertical and horizontal planes. Once it is secure, you can attach the side walls to it.
Step 5: Install the side and rear walls
With the front wall in place, work your way around the sauna. Each side wall panel slides into the tongue-and-groove channels and locks to the adjacent panel. The rear wall goes in last, and this is where the rear buckles come into play. The buckles are designed to pull the panels tightly together, but they are located on the outside back of the sauna. That means you need to leave enough space behind the unit to reach them during assembly. Do not push the sauna tight against the wall until after the buckles are fastened.
Take your time with this step. The panels should fit snugly, but if a joint feels too tight, do not force it. Check that the panels are aligned and the channels are clear of debris. A gentle tap with the rubber mallet is usually enough to seat them.
Step 6: Install the bench and heater panels
Once the walls are up, install the bench assembly. The wide 60-inch bench seats up to three adults, so it is a substantial piece. Follow the manual for the correct orientation and fastening method. Then install the heater panels. The Forest uses a combination of quartz heaters and carbon panels mounted on the walls and under the bench. The floor heater goes in last, fitting into the designated space. Make sure all electrical connections are secure and that no wires are pinched.
Step 7: Install the ceiling and lighting
The ceiling panels fit into the top channels of the walls. Depending on the design, you may need to install the overhead red light and NIR array before or after the ceiling panels. The manual will specify the order. The LED lighting strips are usually pre-installed or clip into place. Connect the wiring harnesses according to the color-coded plugs. Do not force any connection; they should click together easily.
Step 8: Final checks and electrical hookup
Before you plug anything in, do a visual inspection. Check that all panels are tight, the door opens and closes smoothly, and the bench is stable. Then, have your licensed electrician make the final connection to the 220V-240V dedicated circuit. The sauna should be on its own breaker, sized according to the manufacturer's specifications. Once power is connected, turn on the sauna and test each function: heaters, red light, LED lighting, Bluetooth audio, and ventilation fan. Let it run for 15-20 minutes to burn off any manufacturing residues, then it is ready for your first session.
How the Infrared Heating System Works
Understanding how your sauna produces heat helps you appreciate what makes the YardSauna Forest different. Traditional saunas heat the air around you, often reaching 180°F or more. Infrared saunas work differently: they use infrared light to heat your body directly, while the air stays relatively cooler—typically between 110°F and 140°F. This allows for a more comfortable and often longer session, and many users report a deeper, more profuse sweat at lower temperatures.
The Forest uses a full-spectrum heating matrix, which means it emits infrared energy across three wavelengths: near, mid, and far. Near-infrared is the shortest wavelength and penetrates the skin most deeply. Mid-infrared targets the middle layers of tissue, and far-infrared is absorbed by the surface of the skin, creating that familiar warming sensation. By combining all three, the sauna aims to provide a more complete and effective heat experience than a single-wavelength unit.
The heating elements themselves are a mix of high-output quartz tubes and ultra-low EMF carbon panels. Quartz heaters are known for their rapid heat-up time and intense output, while carbon panels provide a gentler, more even heat over a larger surface area. The carbon panels in the Forest are specifically designed to emit very low electromagnetic fields (EMF), which is a concern for many sauna users. The floor heater uses tourmaline, a mineral that is often included in infrared saunas for its purported ability to enhance the infrared output and add a subtle warmth to the lower extremities.
Because the heat is delivered via light waves, the sauna does not need to preheat for as long as a traditional sauna. Most users find that 15-20 minutes is sufficient to reach a comfortable temperature, though the exact time depends on your room's ambient temperature and your personal preference. The digital touch console lets you set the temperature and session duration, and the multi-speed ventilation fan helps regulate humidity and fresh air flow.
Placement Considerations for a Pre-Built Unit
Where you put your sauna is just as important as how you assemble it. A pre-built unit like the Forest gives you flexibility, but there are still some key factors to weigh. The first is floor space. The sauna's footprint is 60 inches by 45 inches, but you need additional clearance for the door swing, for accessing the rear buckles during assembly, and for general maintenance. A good rule of thumb is to allow at least 12 inches on the sides and back, and 24-30 inches in front of the door.
Ceiling height is another consideration. The Forest is 75 inches tall, which is just over 6 feet 2 inches. Most standard ceilings are 8 feet or higher, so clearance is rarely an issue. However, if you are placing the sauna in a basement with a drop ceiling or low ductwork, measure carefully. You also need to account for the height of the sauna plus any flooring or platform you might add.
Ventilation is critical. Even though infrared saunas produce less steam than traditional saunas, you will still sweat, and that moisture needs somewhere to go. The Forest has a built-in multi-speed ventilation fan, but the room itself should have some airflow. A small window, an exhaust fan, or even a dehumidifier in the room can help prevent mold and mildew. If you are installing in a basement, check the humidity levels before and after a session.
Finally, think about the electrical path. The sauna requires a dedicated 220V-240V circuit, which means your electrician will need to run a new line from your breaker panel to the sauna's location. The shorter and more direct that run, the less expensive the installation. If your panel is on the opposite side of the house, you may want to choose a different room or budget for a longer wire run.
Common Mistakes to Avoid
Even with a well-designed kit, installation mistakes can happen. Here are the most common pitfalls and how to steer clear of them.
- Skipping the leveling step. A sauna that is not level can cause the door to bind, the panels to separate, and the bench to feel unstable. Take the time to level the floor before you start, and check again after the walls are up.
- Forcing panels together. Tongue-and-groove joints should fit snugly but not require brute force. If a panel will not seat, check for debris in the channel or misalignment. Forcing it can crack the wood or damage the finish.
- Pushing the sauna against the wall too early. The rear buckles need to be fastened from behind, so you must leave access space until that step is complete. Once the buckles are tight, you can carefully slide the sauna into its final position.
- Using the wrong electrical connection. This sauna is not a 120V plug-and-play unit. Attempting to run it on a standard outlet will trip breakers or damage the electronics. Always use a licensed electrician and a dedicated 220V-240V circuit.
- Ignoring the burn-off period. New saunas often have a slight odor from manufacturing oils and wood treatment. Running the sauna empty for 15-20 minutes before your first session helps dissipate those smells and ensures a clean experience.
- Overlooking moisture management. Even a low-humidity infrared sauna adds some moisture to the room. Without proper ventilation, you risk mold growth on nearby walls or floors. Use the built-in fan and consider a room dehumidifier if needed.
Practical Tips and Pre-Installation Checklist
To make your installation day go smoothly, here is a checklist of things to do before the boxes arrive, plus some expert tips for getting the most out of your sauna.
- Measure your space twice: width, depth, and height, including doorways and hallways the boxes must pass through.
- Clear the installation area of furniture and debris, and lay down a drop cloth or cardboard to protect the floor.
- Schedule your electrician for the same day or the day after assembly, so you can test the sauna immediately.
- Have a friend or family member on hand—two people make assembly much easier and safer.
- Read the entire manual before starting, and keep it nearby during assembly.
- Use a level frequently; small adjustments early prevent big problems later.
- After assembly, run the sauna at maximum temperature for 20 minutes to burn off any residues, then wipe down the interior with a damp cloth.
- Place a towel or mat outside the door to catch drips when you exit.
Take your time with the rear buckles—they are the key to a tight, rattle-free sauna. If you rush this step, you may end up with gaps that let heat escape and make the sauna feel less solid.
Buyer Considerations: Is the Forest Right for You?
Before you commit to the YardSauna Forest, think about how it fits your needs. The 3-person capacity is ideal for couples, small families, or anyone who wants extra room to stretch out. The wide 60-inch bench is a standout feature, giving each user ample personal space. If you plan to use the sauna solo most of the time, the extra space is still a luxury—you can lie down, do gentle stretches, or simply enjoy not feeling cramped.
The full-spectrum heating matrix is a major selling point. Many budget saunas use only far-infrared carbon panels, which can leave your lower legs and feet feeling cool. The Forest's combination of quartz heaters, carbon panels, and a tourmaline floor heater is designed to provide more complete coverage. The overhead red light and NIR array is another differentiator, adding a therapeutic light component that many users appreciate for skin and muscle recovery—though individual results vary.
On the practical side, the 220V-240V electrical requirement is a consideration. If you live in an older home with a full electrical panel, adding a dedicated circuit may require a panel upgrade, which adds cost and complexity. However, for most homeowners, running a single 220V line is a straightforward job for a licensed electrician. The sauna's energy efficiency is also worth noting: because it heats the body directly, it uses less power than a traditional sauna of similar size, and many users find their sessions are shorter, which further reduces energy use.
Finally, consider the aesthetic. The Canadian Hemlock interior is light and bright, and the panoramic glass front makes the sauna feel open rather than claustrophobic. If you are placing the sauna in a visible part of your home, the Forest's clean lines and modern features—like the ambient LED lighting and touch console—will complement your decor rather than clash with it.
A Closer Look at the Assembly Experience
Let's walk through a real-world assembly scenario to give you a feel for the process. Imagine you have cleared a corner of your finished basement, about 8 feet by 8 feet, with a concrete floor and a nearby 220V outlet that was previously used for a dryer. You have a friend helping, and you have set aside a Saturday morning.
You start by unboxing everything and laying out the panels. The front wall with the glass door is heavy, so you and your friend carefully carry it to the installation spot and set it on the floor channel. You check for level—good. Then you attach the left side wall, then the right. The panels slide together with a satisfying click, and you use the rubber mallet to seat them fully. The rear wall goes in last, and you reach behind to fasten the buckles. Because you left 18 inches of clearance, it is easy to reach. Once the buckles are tight, you and your friend slide the sauna back against the wall, leaving a 6-inch gap for ventilation.
Next, you install the bench. It is a single wide piece that spans the back wall, and it fits into pre-drilled brackets. The heater panels go in next—two on the side walls, one under the bench, and the floor heater in the center. The wiring harnesses are color-coded, so you cannot plug them in wrong. The ceiling panels go on top, and you connect the overhead red light array. Finally, you plug in the control console and turn on the power. The sauna hums to life, the LED lights glow, and the digital display shows the temperature climbing. In just under an hour, you are ready for your first session.
This scenario is typical, but every home is different. The key is to follow the manual, take your time, and not be afraid to call the manufacturer's support line if you hit a snag. Most issues are minor and easily resolved.
Video Walkthrough: See the Assembly in Action
Sometimes it helps to watch someone else go through the process before you start. In this video, an experienced sauna reviewer walks through the assembly and setup of a similar infrared sauna, highlighting the key steps and common pitfalls. He discusses the floating floor design, the front-wall-first assembly sequence, and the rear buckle access issue—all of which are relevant to the YardSauna Forest. While the specific model in the video is different, the general principles apply, and you will get a clear sense of what to expect on installation day.
The reviewer also shares his honest assessment of build quality, heat coverage, and EMF performance, which can help you set realistic expectations for any infrared sauna in this category. He emphasizes the importance of leaving space behind the unit during assembly and the value of having a second person to help with the heavy panels.
Final Thoughts: Is the YardSauna Forest Your Next Home Upgrade?
Installing a home sauna is a project that pays dividends in comfort, relaxation, and daily routine. The YardSauna Forest 3-Person Infrared Sauna is designed to make that project as painless as possible. With its modular tongue-and-groove panels, two adults can have it assembled in under an hour, and the pre-built design means no construction mess. The 220V-240V electrical requirement is the one step that calls for a professional, but once that is in place, you have a self-contained wellness retreat in your own home.
What sets the Forest apart is its attention to complete, even heating. The surround full-spectrum heating matrix, overhead red light and NIR array, and extended tourmaline floor heater work together to warm your entire body—not just your back and shoulders. The wide 60-inch bench makes it comfortable for multiple users, and the Canadian Hemlock construction is both beautiful and durable. If you are looking for a sauna that delivers a premium experience without the premium price tag of a custom build, the YardSauna Forest 3-Person Infrared Sauna is a compelling choice.
Remember, every home is different, and your installation experience will depend on your space, your electrical setup, and your DIY comfort level. But with the right preparation and a careful approach, you can be enjoying your first sauna session within a day of delivery. This guide is for informational purposes only, and you should always consult the manufacturer's manual and a licensed electrician for your specific installation.
Frequently Asked Questions
1. Do I need a professional to install the YardSauna Forest?
Assembly of the sauna cabin itself is designed for two adults and does not require special skills—just basic tools and careful reading of the manual. However, the electrical connection must be done by a licensed electrician because the sauna requires a dedicated 220V-240V circuit. You can assemble the cabin yourself and have the electrician do the final hookup.
2. Can I install the sauna on carpet?
It is not recommended to place the sauna directly on carpet. The weight of the unit can compress the carpet and make leveling difficult, and moisture from sweating can get trapped. If you must use a carpeted room, place a rigid plywood base or a moisture-resistant mat under the sauna to provide a stable, level surface.
3. How much clearance do I need around the sauna?
Plan for at least 12 inches of clearance on the sides and back for ventilation and access, and 24-30 inches in front of the door for easy entry and exit. During assembly, you will need extra space behind the sauna to reach the rear buckles, so avoid placing it tight against a wall until after that step is complete.
4. What kind of electrical outlet does the sauna need?
The YardSauna Forest requires a 220V-240V dedicated circuit, not a standard 120V household outlet. Your electrician will need to run a new line from your breaker panel to the sauna's location and install the appropriate outlet or hardwire connection according to local code.
5. How long does assembly take?
For two adults with basic DIY experience, assembly typically takes 45 to 60 minutes. This assumes you have all parts organized, the floor is level, and you follow the manual's sequence. Allow extra time for unboxing and for the electrician's work.
6. Can I use the sauna outdoors?
The YardSauna Forest is designed for indoor use only. Placing it outdoors would expose the wood and electronics to moisture, temperature extremes, and pests, which could damage the unit and void the warranty. If you want an outdoor sauna, you would need a model specifically built for that environment.
7. What is the burn-off period, and why is it necessary?
New saunas often have a slight odor from manufacturing oils and wood treatment. Running the sauna empty at maximum temperature for 15-20 minutes before your first session helps dissipate these smells. After the burn-off, wipe down the interior with a damp cloth and let it air out.
8. How do I clean and maintain the sauna?
Regular maintenance is simple. Wipe down the bench and interior surfaces with a damp cloth after each use to remove sweat. Periodically vacuum the floor and check the heater panels for dust. Avoid using harsh chemicals or abrasive cleaners on the wood. The ventilation fan should be checked and cleaned as needed.
9. Will the sauna increase my electric bill significantly?
Infrared saunas are generally more energy-efficient than traditional saunas because they heat the body directly and require less preheating time. The exact cost depends on your local electricity rates and how often you use the sauna, but many users report a modest increase—often less than running a large appliance like a dryer.
10. Can I move the sauna after it is assembled?
Yes, but it is heavy and bulky. If you need to relocate it, you will likely need to disassemble it partially or use furniture sliders and multiple people. The rear buckles and panels can be removed in reverse order, but it is easier to plan the location carefully from the start.
11. Is the sauna safe for children or pets?
Saunas are generally not recommended for young children, as their bodies regulate heat differently. Always supervise any use by older children and keep pets out of the sauna. The glass door can get warm, so use caution. Follow the manufacturer's safety guidelines and consult a healthcare provider if you have concerns.
12. What is the warranty on the YardSauna Forest?
Warranty terms can vary, so check the product page or contact customer support for the most current information. Typically, the wood structure and heating elements are covered for a set period, while electronics and accessories may have shorter coverage. Register your sauna after purchase to ensure warranty service if needed.
For more on low-EMF home infrared saunas and the models we offer, visit yardsauna.com.
This article is for informational purposes only and does not constitute medical advice. Always consult a qualified healthcare provider before starting any new wellness routine, especially if you have pre-existing conditions or are pregnant.